Toyota OBD I Diagnostic Codes


Full list of OBD I Diagnostic Trouble Codes for your Toyota Vehicle. If your Check engine light is on you may have a serious problem. Scan your codes and follow the chart to determine what the code means. Some shops will scan your codes for free. Or do it yourself with the procedure posted below.
ACCESSING DIAGNOSTIC TROUBLE CODES
Normal Mode
Prior to considering the ECM (TCCS) system as cause for a complaint, ensure the battery is fully charged and the engine and all related systems are operating properly. When diagnosing ECM (TCCS) malfunctions, observe all precautions and follow procedures as outlined to ensure successful repairs.
The ECM self diagnosis circuit detects and stores system malfunctions related to the various sensor and actuator circuits. These malfunctions are stored as codes in the ECM memory as long as battery voltage is applied to the ECM, and in most cases, the Check Engine lamp will flash as long as a malfunction is present. By analyzing these codes, system malfunctions can be easily diagnosed and repaired. To obtain codes stored in the ECM memory, proceed as follows:
How to pull Toyota Codes without a scantool
To extract DTCs from the computer for diagnostic purposes, the Self Test connector is used.
|
||||||||||||||||||||||||||||||||||||||||||||||||||||||||||||||||||||||||||||||
-
Short terminals of check engine connector or service connector (depending on model) with suitable jumper wire.
-
Diagnostic codes will be indicated by the number of flashes of the Check Engine lamp.
Two Trip Detection Logic
When a logic malfunction is first detected, the malfunction is temporarily stored in the ECM memory. If the same case is detected again during the second drive test, the second detection causes the Check Engine light to illuminate. In order for this mode to store codes, the ignition switch must be turned Off between the first and the second test. Refer to "Trouble Code Interpretation" for applicable two trip detection logic codes.
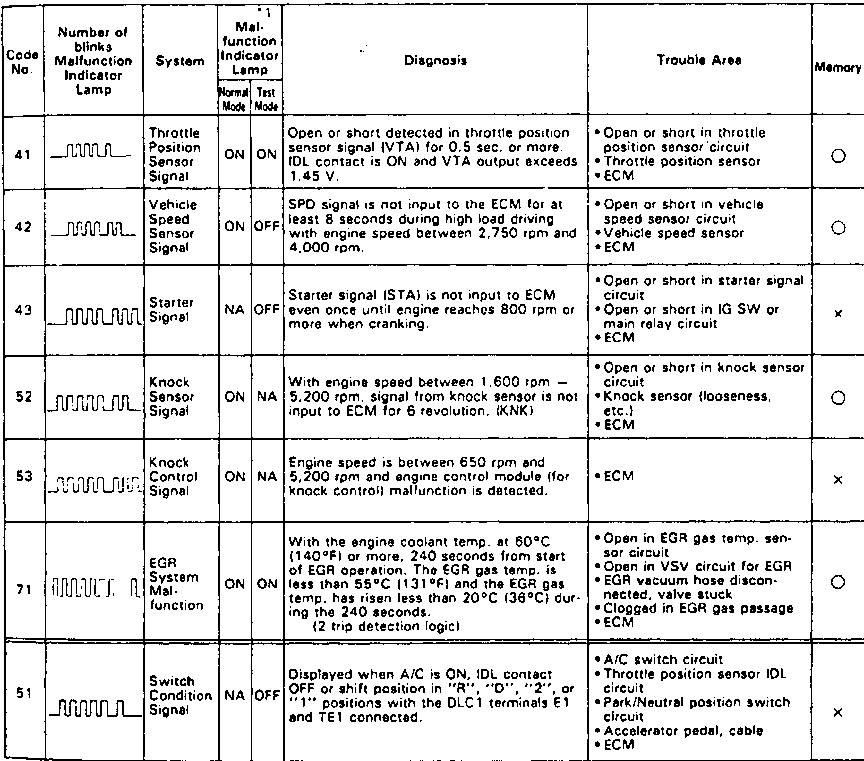
Test Mode
The test mode has a higher sensing ability to detect faults than in normal mode. It can detect malfunctions in the starter signal circuit, air conditioning signal and neutral start switch signal. In addition, the test mode also detects the same malfunctions as in the normal mode.
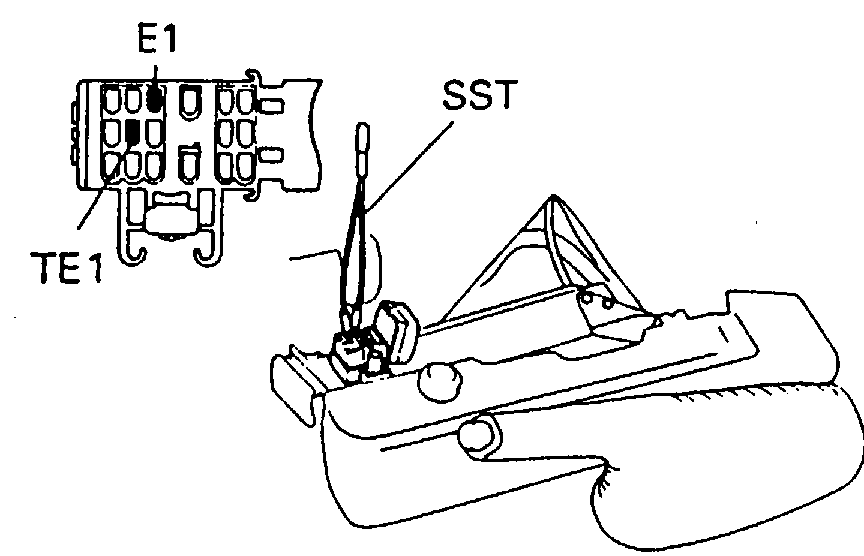
- Ensure battery voltage is at least 11 volts, throttle valve is fully closed, transmission is in neutral position and accessories in Off position.
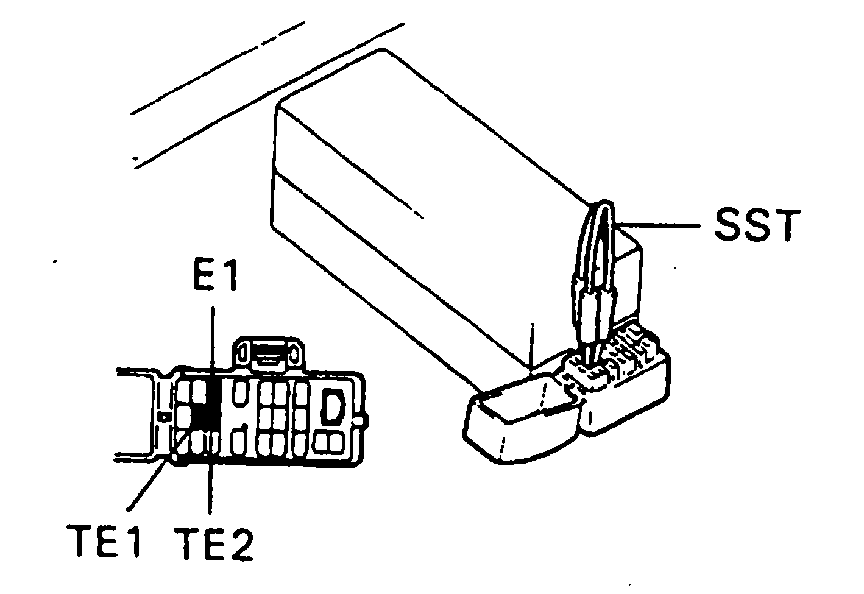
- Short check service connector terminals TE2 and E1, with suitable jumper wire, Fig. 21 and Fig.22, then turn ignition switch On to enter test mode, check engine lamp should illuminate. Test mode may not be entered if terminals TE2 and E1 are shorted after ignition switch is turned On.
- Start engine and drive vehicle at 10 mph or higher. If vehicle is not driven vehicle speed signal codes 42 and 43 may be stored.
- Simulate malfunction conditions.
- Using suitable jumper wire, short check connector terminals TE1 and E1, then read codes as outlined under "Accessing Diagnostic Trouble Codes."
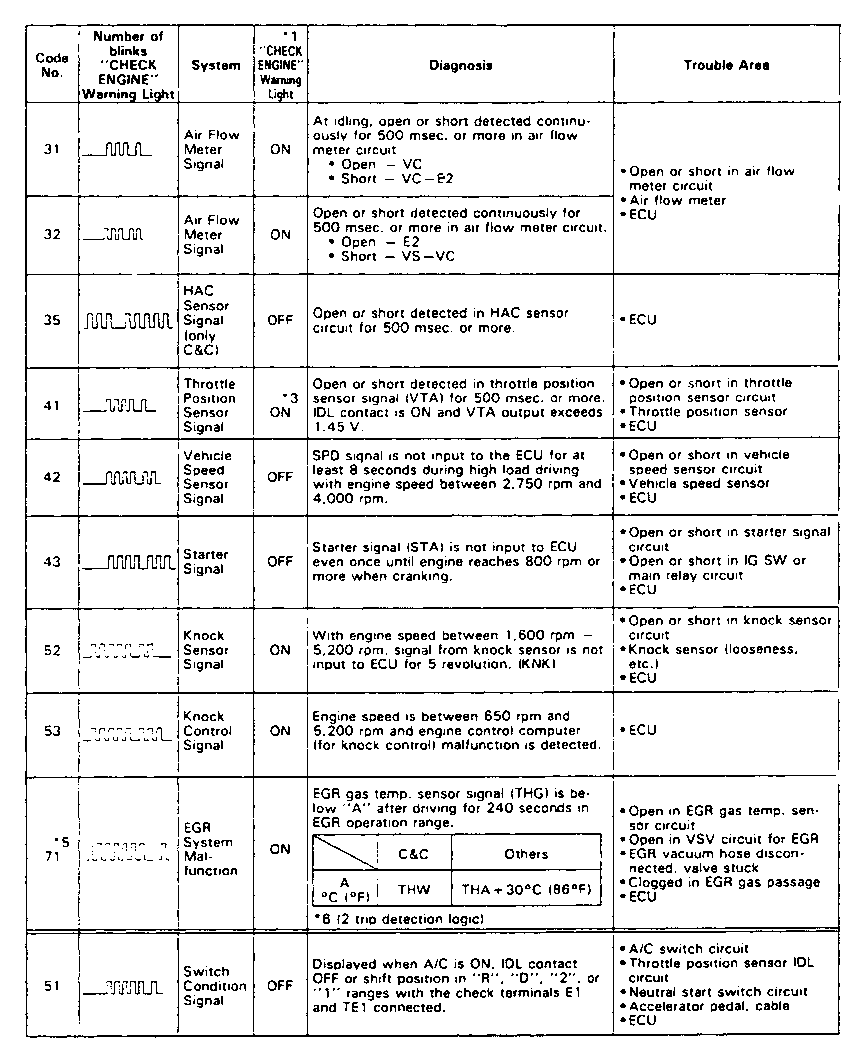
READING DIAGNOSTIC TROUBLE CODES
- Normal system operation is indicated by the "Check Engine" lamp blinking as follows:
a. Once every .25 to .26 seconds on 1990-91 3E-E, 4A-GE, 3S-FE, 3S-GTE, 1990 5S-FE Celica, 1991-93 4A-FE and 7A-FE, 1991-93 5S-FE MR2, 2TZ-FE, 1990-91 2VZ-FE, 7M-GE, 7M-GTE, 2JZ-GE, 2JZ-GTE, 1FZ-FE and 3VZ-E.
b. The check engine lamp will blink once every .5 seconds on 3E, 1992 3E-E, 3F-E, 1990-91 4A-FE, 5E-FE, 1991-93 5S-FE Camry and Celica, 1990-92 3F-E, 3VZ-FE and 22R-E. - On all models except 3E engines, the check engine lamp will blink every .5 to .52 seconds. The first number of blinks will equal the first digit of a two digit diagnostic code and after a 1.5 second pause, the second number of blinks will equal the second diagnostic code. If there are two or more codes, there will be a 2.5 second pause between each. After all the codes have been signalled, there will be a 4.5 second pause and they will all be repeated as long as check connector terminals T (TE1) and E1 are shorted. In the event of a number of trouble codes, indication will begin from the smaller value and continue in order to the larger. After diagnosis is completed, remove jumper wire from check connector terminals.
- On 3E engines, the check engine lamp will blink every .48 seconds. The first number of blinks will equal the first digit of a two digit diagnostic code and after a 1.44 second pause, the second number of blinks will equal the second diagnostic code. If there are two or more codes, there will be a 2.4 second pause between each. After all the codes have been signalled, there will be a 4.5 second pause and they will all be repeated as long as check connector terminals T (TE1) and E1 are shorted. In the event of a number of trouble codes, indication will begin from the smaller value and continue in order to the larger. After diagnosis is completed, remove jumper wire from check connector terminals.
- On all models, check affected circuit and components and repair as necessary.
CLEARING DIAGNOSTIC TROUBLE CODES
After service, the diagnostic code or codes retained in the ECM memory must be cleared by removing the SFI (EFI) fuse, on all models except Corolla and 1990 Tercel, for approximately 30 seconds or more, depending on ambient temperature (the lower the temperature, the longer the fuse must be left out) with the ignition switch off. Code cancellation is accomplished on 1990-92 Corolla models by removing the STOP fuse, and on 1993 Corolla models by removing the SFI (EFI) fuse for approximately 10 seconds, depending on ambient temperature (the lower the temperature, the longer the fuse must be left out) with the ignition switch off. On 1990 Tercel models, codes are cancelled by removing the RADIO No. 1 fuse for approximately 10 seconds, depending on ambient temperature (the lower the temperature, the longer the fuse must be left out) with the ignition switch off.
Code cancellation can also be done by removing the battery ground cable, but keep in mind that other memory systems (clock) will also be cancelled out. If the diagnostic code is not cancelled out, it will be retained by the ECM and appear along with a new code in the event of future trouble. If it is necessary to work on engine components requiring removal of the battery ground cable, ensure no codes are stored. After cancellation, road test the vehicle to check that a normal operating code is now obtained on the check engine warning lamp. If the same diagnostic code appears, the trouble has not been corrected thoroughly.
Free Auto Repair Manuals - Find a vehicle specific auto repair manual. Get the auto repair manual with full instructions and illustrations.Toyota DTC's (Diagnostic Trouble Codes)
Toyota Codes
1990 - 1991 Toyota Codes
1992 Toyota Codes
1993 Toyota Codes
Data Link Connector Location Diagrams
Fig 1 - 2TZ-FE engine
Fig 2 - 2VZ-FE engine
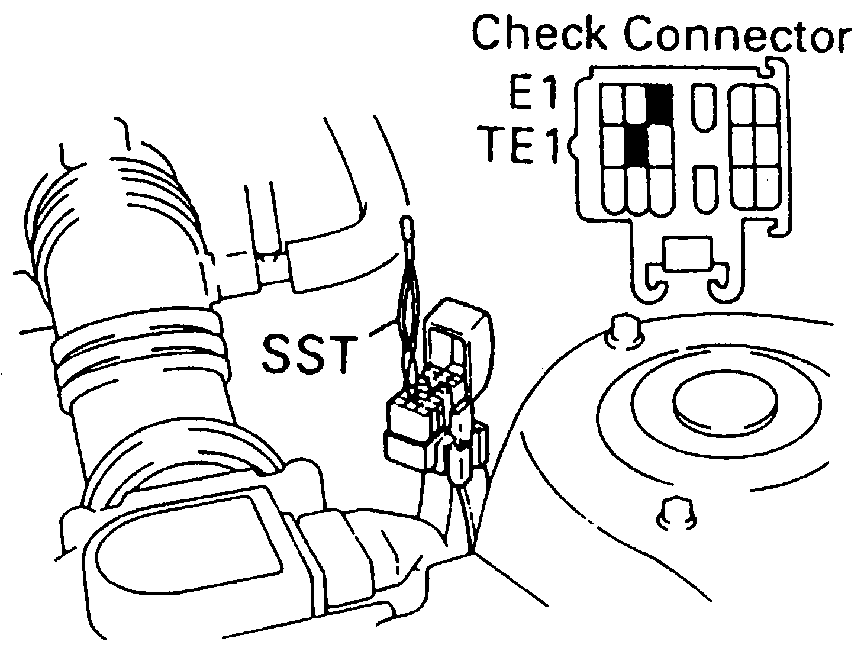
Fig 3 - 3E California engine
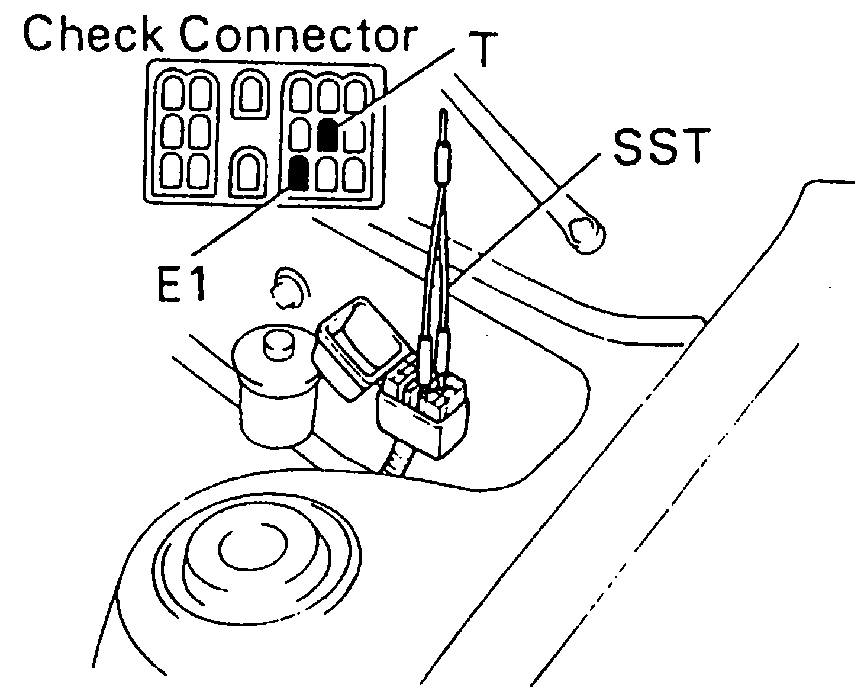
Fig 4 - 1990 3E-E engine
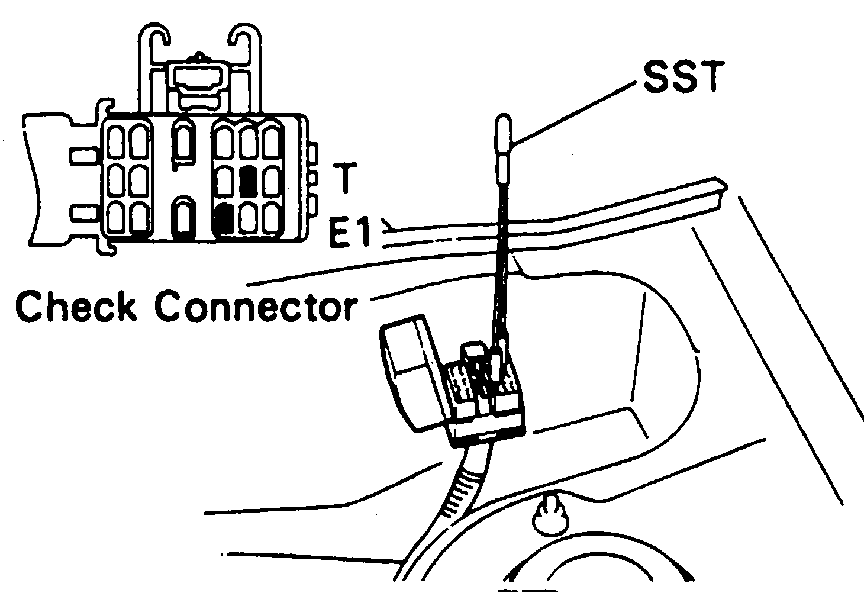
Fig 5 - 1991-93 3E-E engine
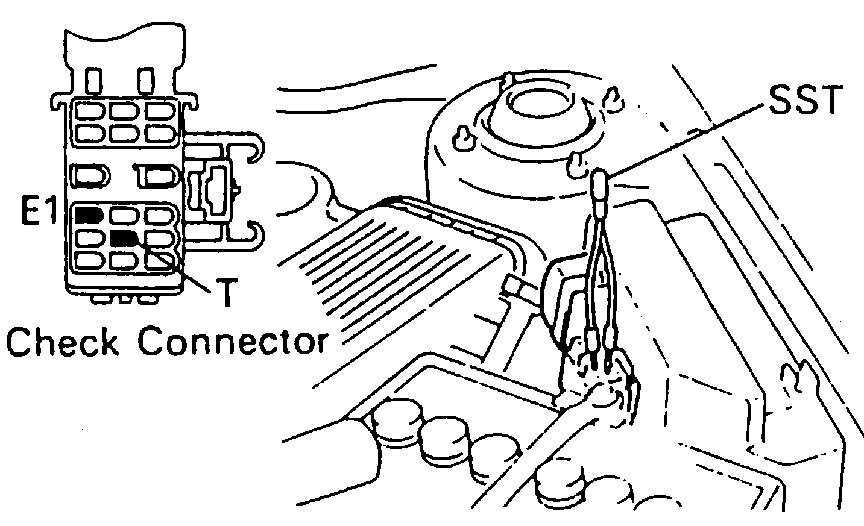
Fig 6 - 3F-E engine

Fig 7 - 3S-FE engine
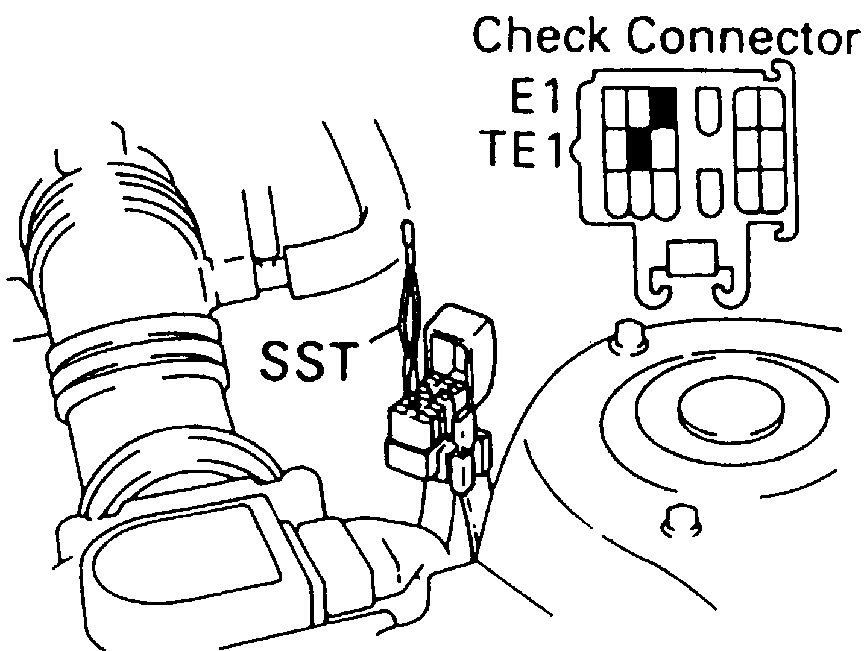
Fig 8 - 3S-GTE engine
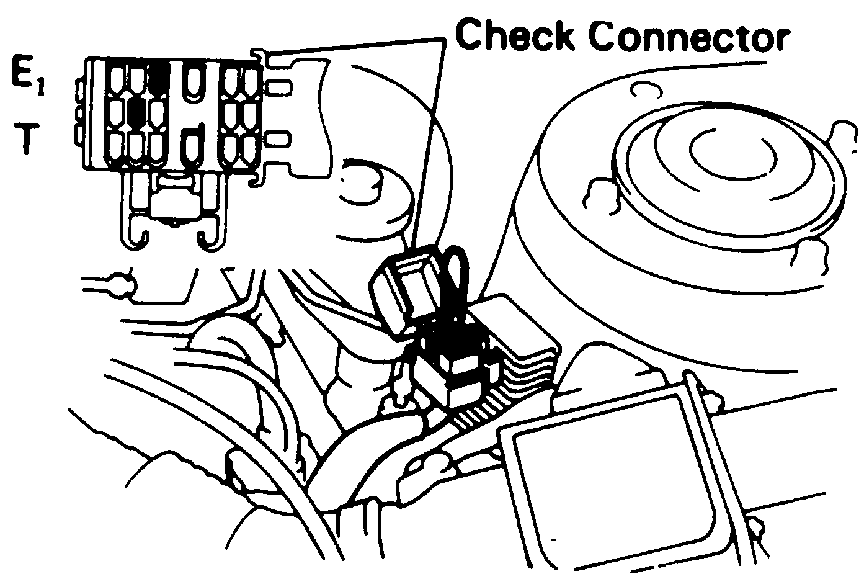
Fig 9 - 2JZ-GE and 2JZ-GTE engine
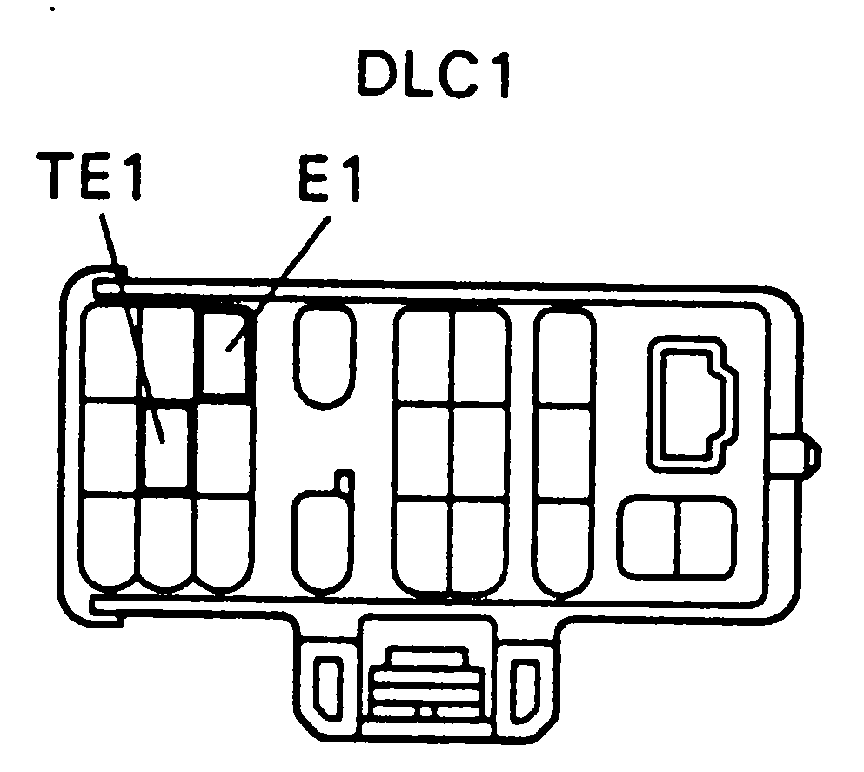
Fig 10 - 3VZ-E and 22R-E engine
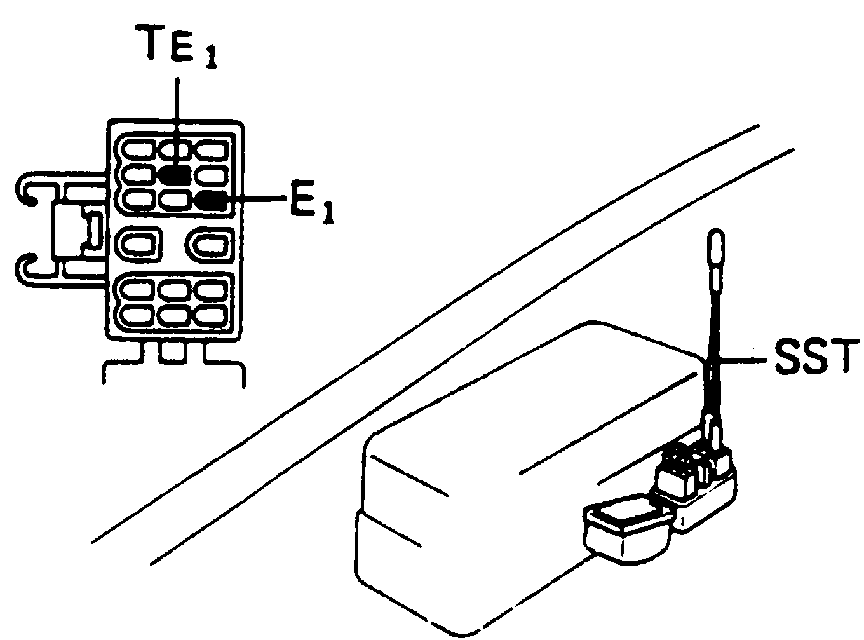
Fig 11 - Celica with 3S-GTE, 4A-FE and 5S-FE engine
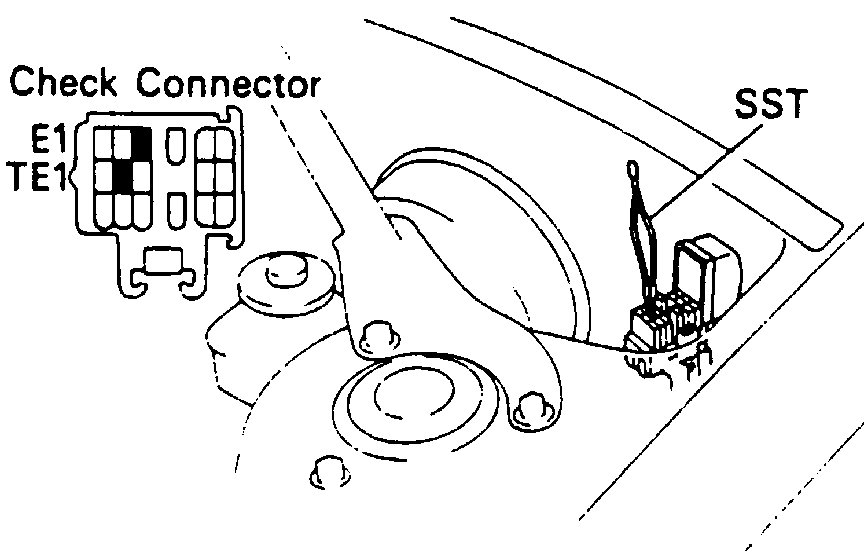
Fig 12 - 1991-93 MR2 with 3S-GTE and 5S-FEengine
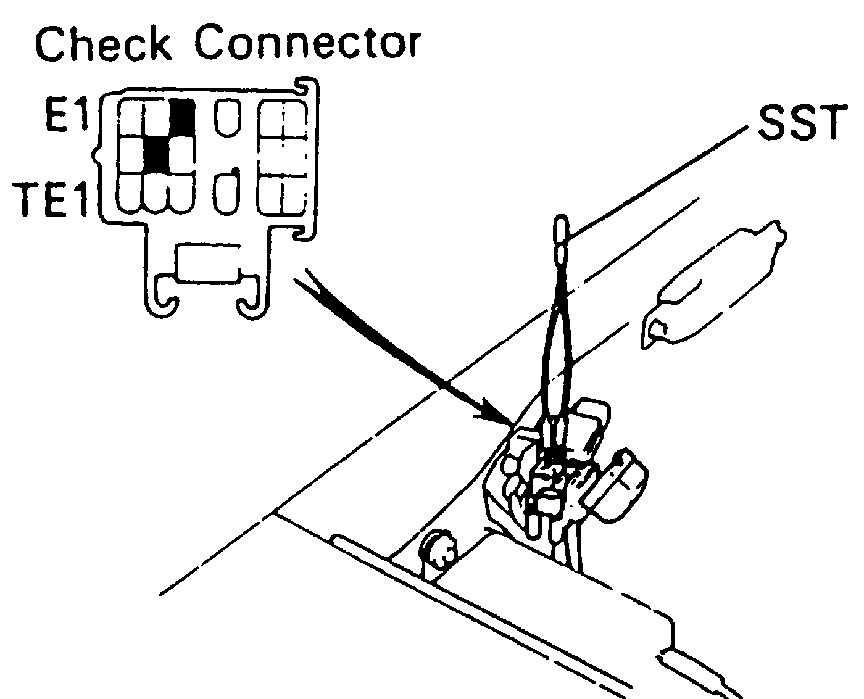
Fig 13 - 1992-93 Camry with 3VZ-FE and 5S-FE engine
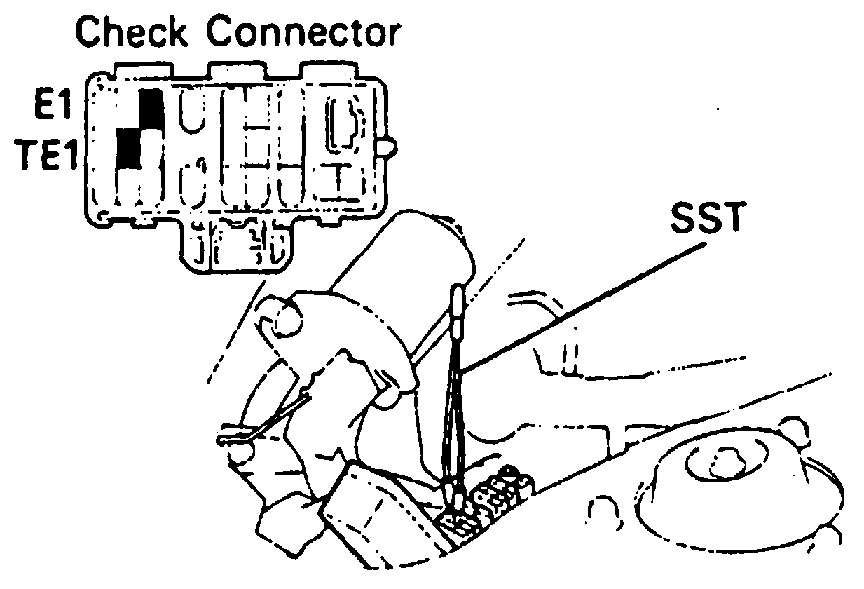
Fig 14 - 1990-92 Corolla with 4A-FE engine
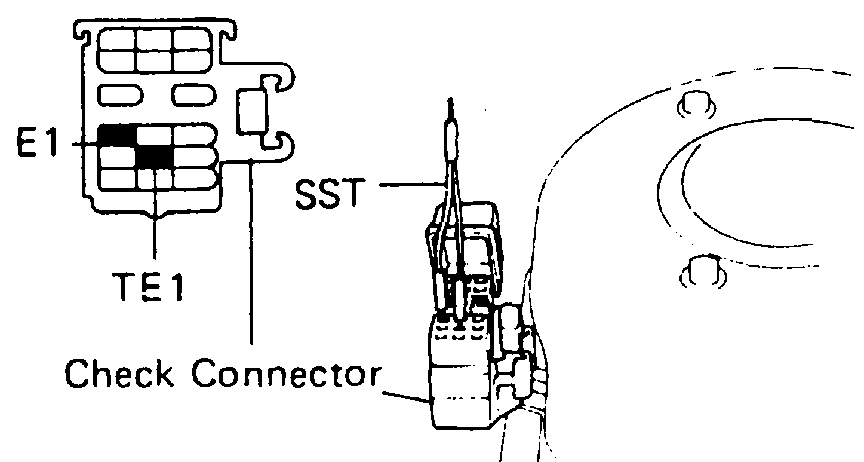
Fig 15 - 1993 Corolla with 4A-FE and 7A-FE engine
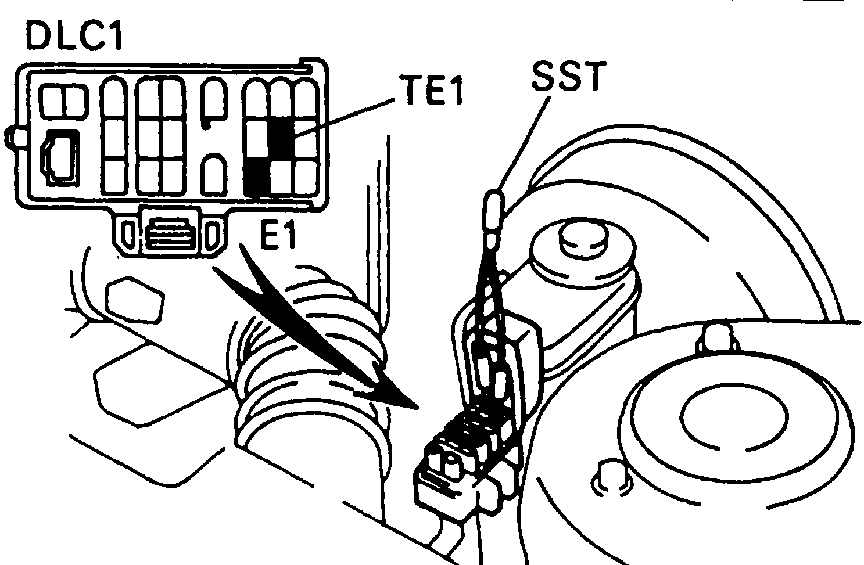
Fig 16 - 1FZ-FE engine
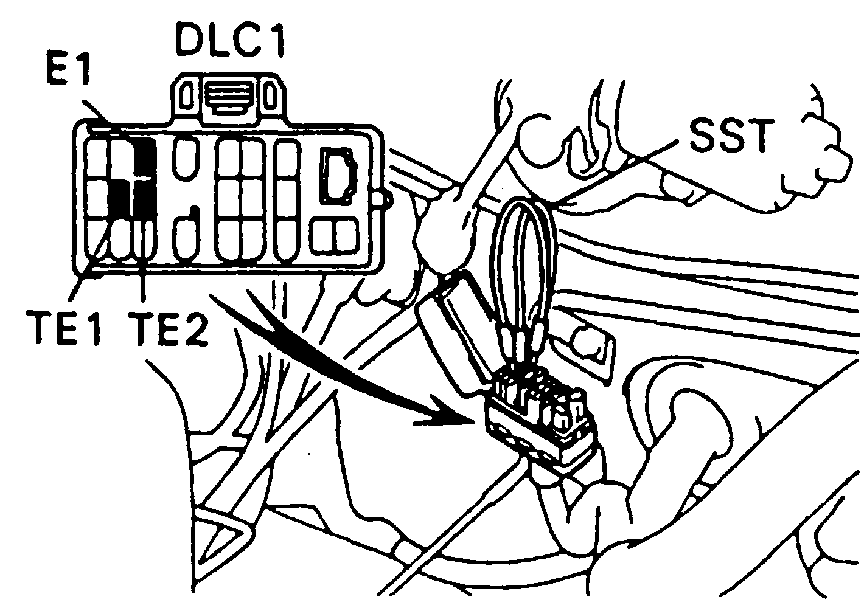
Fig 17 - 4A-GE engine
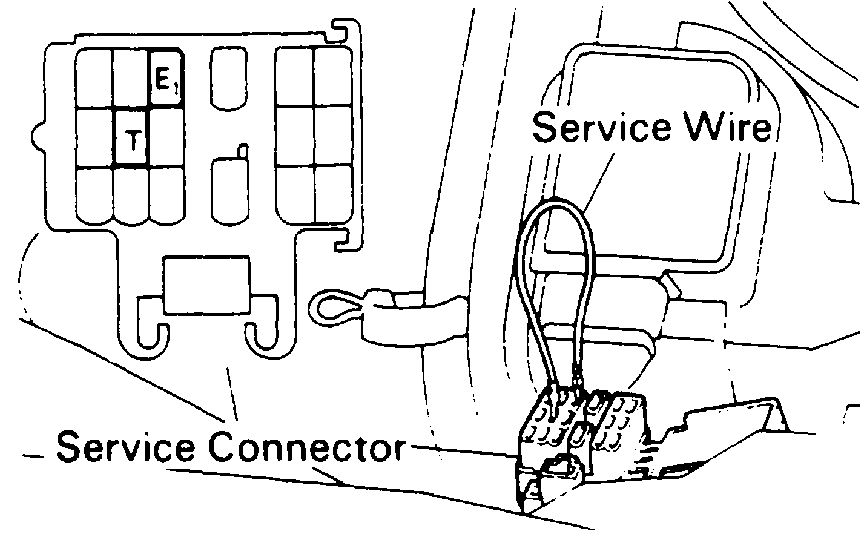
Fig 18 - 5E-FE engine

Fig 19 - Cressida with 7M-GE engine
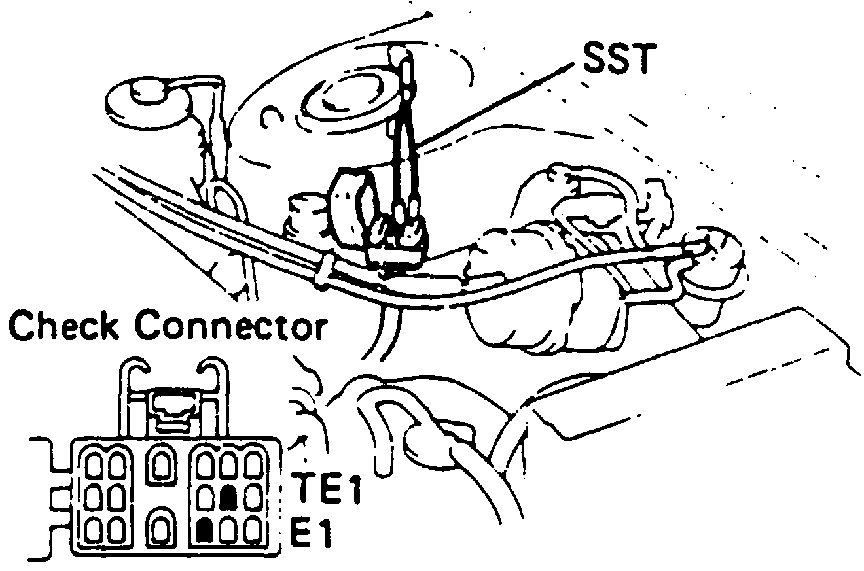
Fig 20 - Supra with 7M-GE and 7M-GTE engine
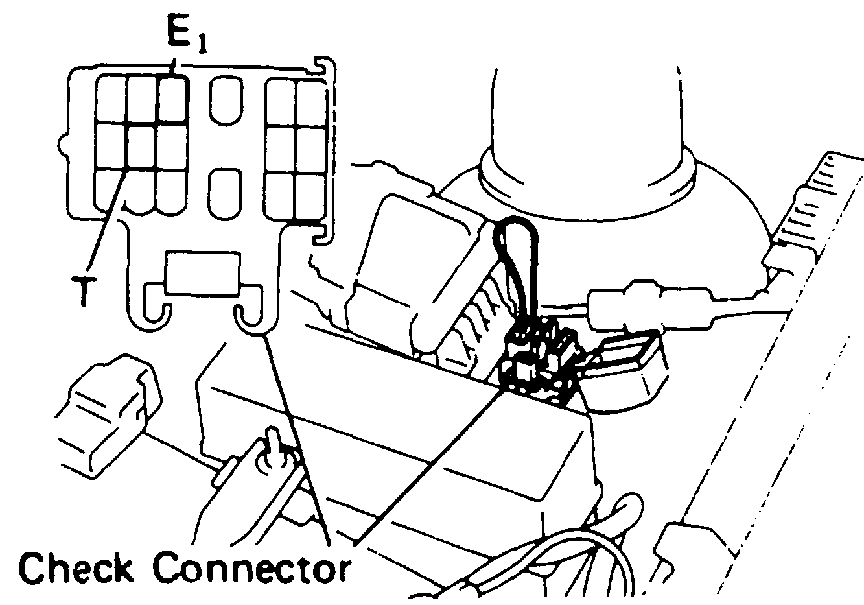
Fig 21 - Supra, Camry and Cressida engine
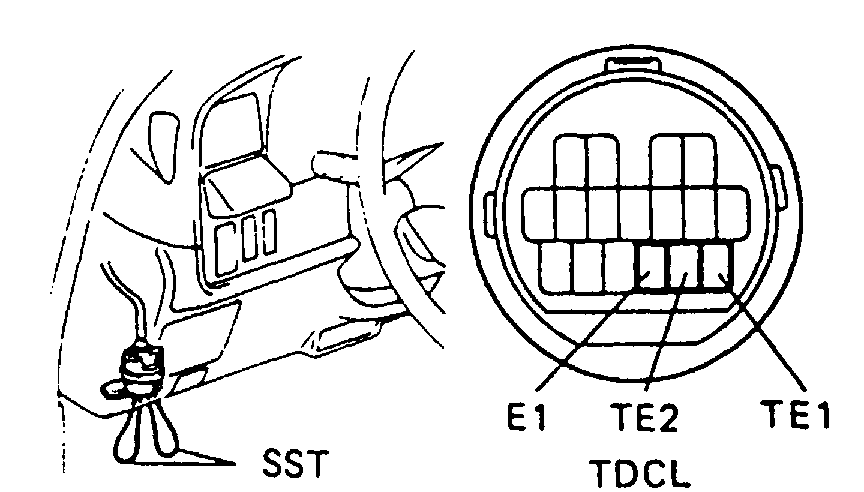
Fig 22 - 3VZ-E and 22R-E engine


Car AC Check - How to check car ac for manual air conditioning or climate control systems