So I blew a head gasket on my 2009 Mazda 3 2.0 liter automatic. I swapped out the head with another one from a good motor. Everything is tightened up, everything is timed so I go to turn it over with my ratchet on the pulley bolt and it will only go halfway. Then there’s a dead stop I can feel myself trying to force it. I don’t want to.
Bore Scope if you have one. If it is 100% correctly timed then you are looking at taking it back apart. Something may have fallen in a cylinder. Might find that missing socket you have been looking for. Don’t sweat it, stuff like this happens. We do what we can to prevent it, but things happen. Taking it back apart will let you see what is causing the issue with not being able to turn the engine over. Also, I am assuming you are turning the engine over with the spark plugs removed. In most cases it is out of time. That is why after you replace the timing chain/belt the last step is to turn the engine over TWO times and check timing marks.
TIMING CHAIN, REPLACE
Caution: With timing chain removed, avoid turning camshaft or crankshaft. If movement is required, exercise extreme caution to avoid valve damage caused by piston contact.
- Relieve fuel system pressure as follows:
a. Remove fuel filler cap and relieve pressure in fuel tank.
b. Remove fuel pump relay.
c. Start engine.
d. After engine stalls, crank starter several times.
e. Turn ignition OFF.
f. Install fuel pump relay.
g. Install fuel filler cap. - Remove battery cover.
- Disconnect and isolate battery ground cable.
- Remove plug hole plate.
- Disconnect wiring harness.
- Remove ignition coils and spark plugs.
- Remove ventilation hose.
- Remove coolant reserve tank with hose still connected and set it out of way.
- Remove front wheel and tire.
- Remove aerodynamic under cover No. 2 and splash shield as a single unit.
- Remove power steering pipe brace nut, then set power steering pipe component out of way.
- Remove drive belt.
- Remove Crankshaft Position (CKP) sensor.
- Remove A/C compressor with cooler hose still connected, and secure it using wire or rope so that it is out of way.
- Disconnect righthand drive shaft from joint shaft, then set drive shaft out of way.
- Remove engine oil dipstick.
- Remove purge solenoid valve installation bracket with evaporative hose still connected and set it out of way.
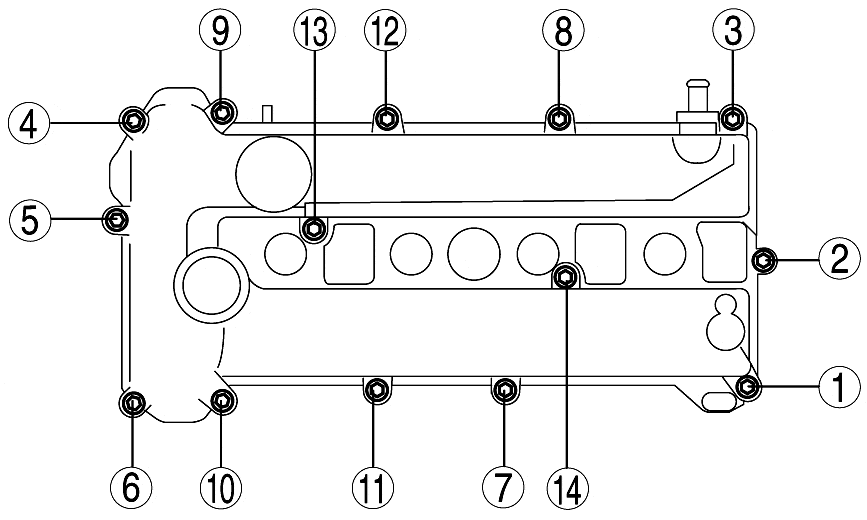
- Loosen valve cover bolts in sequence as illustrated in Fig. 1.
- Remove valve cover.
- Rotate crankshaft in direction of engine rotation, and remove cylinder block lower blind plug when No. 1 cylinder is at point prior to Top Dead Center (TDC) of compression. Then install crankshaft pulley holding tool Nos. 49 B011 105 and 205-072, or equivalents.
- Rotate crankshaft in direction of engine rotation so that No. 1 piston is at TDC of compression stroke (until counterweight contacts crankshaft pulley holding tool and stops).
- Hold crankshaft pulley in place, then remove crankshaft pulley lock bolt and crankshaft pulley.
- Remove water pump pulley.
- Remove drive belt automatic tensioner.
- Install a suitable engine bridge.
- Remove No. 3 engine mount.
- Remove front cover oil seal.
- Remove engine front cover.
- Hold chain tensioner ratchet lock mechanism away from ratchet stem using a thin screwdriver.
- Slowly compress tensioner piston.
- Hold tensioner piston using a .059 inch wire or paper clip.
- Remove chain tensioner, tensioner arm, chain guide and timing chain.
- Reverse procedure to install, note following:
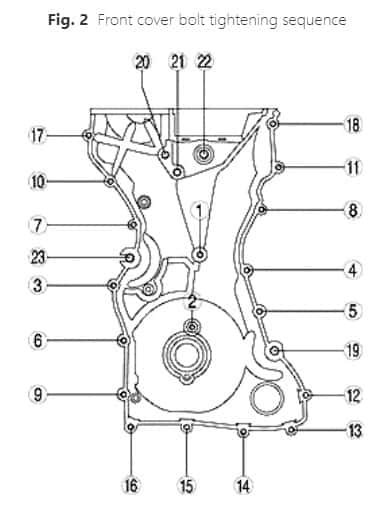
a. Install engine front cover bolts and tighten in three steps using sequence as illustrated in Fig. 2. First step, torque bolt Nos. (1-18) to 84 inch lbs., second step, torque bolt Nos. (19-22) to 35 ft. lbs., third step, torque bolt No. (23) to 20 ft. lbs.
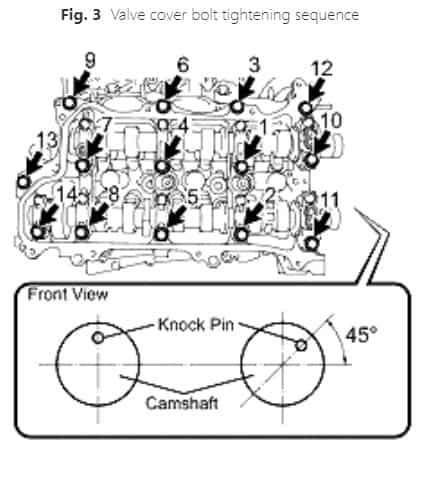
b. Tighten valve cover bolts in sequence as illustrated in Fig. 3. Torque bolts to 80 inch lbs.
c. Install accessory drive belt.
d. Fill cooling system to proper level with recommended coolant.
e. Fill engine crankcase to proper level with recommended engine oil.
f. Connect battery ground cable.
g. Start engine, verify proper operation and ensure there are no leaks.
h. Clear DTC(s) using a suitably programmed scan tool.


