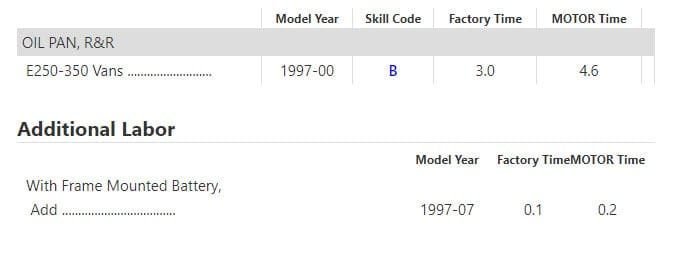
You will find the Auto Repair Manual procedure and labor time for replacing the oil pan on a Ford V10 6.8L engine. Below that you will see the video of how I did it with a lot fewer steps involved. A real time saver in most cases.
Ford V10 Oil Pan Replacement Labor Time

OIL PAN, REPLACE
- Remove throttle body. Refer to “Intake Manifold, Replace.”
- Remove vapor management valve as follows:
a. Disconnect fuel vapor management valve electrical connector and evaporative emission vacuum control hose.
b. Disconnect two evaporative emission return tubes.
c. Remove retaining nuts and fuel management valve. - Partially drain radiator and disconnect radiator upper hose at radiator.
- Remove two screws at top of fan shroud and position fan shroud toward engine.
- Remove nut retaining transmission filler tub at rear of right hand cylinder head and position tube aside.
- Raise and support vehicle.
- Drain engine oil into a suitable container and remove oil filter.
- Remove nuts retaining front engine support insulator to front engine support bracket.
- Remove flywheel inspection plate.
- Position two suitable screw jacks under left and right rear oil pan rails and raise engine.
- Position suitable wood blocks between engine supports and engine support lower bracket.
- Lower engine onto wood blocks.
- Remove oil pan bolts and partially lower oil pan.
- Remove two bolts and nut securing oil pump screen cover and tube and let drop into oil pan.
- Remove oil pan and oil pan gasket from rear of engine.
- Clean mating surfaces and thoroughly clean oil pan.
- Reverse procedure to install, noting the following:
a. Torque oil pump screen cover and tube bolts to 72-108 inch lbs.
b. Torque oil pump screen cover and tube nut to 15-22 ft. lbs.
c. Using sequence shown in Fig. 1, torque oil pan bolts in three steps; first to 18 inch lbs., then to 15 ft. lbs., then rotate 60.°
d. Torque front engine support insulators to 50-68 ft. lbs.
e. Fill engine with oil to specification.
f. Fill cooling system to specification.

