Coolant leaking and getting into oil 2004 Acura Rsx Base
I replaced the thermostat And it was still leaking. Which looked like it was coming from a bolt. So I took it completely off and put it back on. It then looked like it was still leaking as if the back of thermostat housing or further up. It was a slow leak. So I continued to fill radiator with water/coolant. I cranked the car let it run about a min and noticed that the radiator was a lil low gradually missing more a lil faster. I cut the car off. And checked my oil and noticed that it looked as if water/coolant was mixed. I changed the oil drained it. Put new back in. Cranked car again and it was loosing fluid quicker. And then all a sudden on passenger side coming under the dash it looked like i had a creek flowing in fast. And that fluid looked like coolant/oil mix. It looked just like some coffee with lots of sugar and creamer. Under my car i started looking and right beside the crank pulley i see a oil leak. Now whatever has happened. It literally just happened when i replaced thermostat. So I haven’t actually driven the car like this at all. I just cranked it and never moved it. What do you think?
I am going to assume that the engine seems to be running fine without any engine misfiring going on since you didn’t mention it. If there is a check engine light on it may be helpful to know the exact code/s. Why did you need to replace the thermostat to begin with?
Pressure Testing Coolant System
What I would do in your situation would be to perform a pressure test on the cooling system first. And see if it is leaking externally and or internally. You can do this with a coolant pressure tester pretty easy. See the video I made demonstrating just that.
If you see the pressure build above the pressure of the radiator cap(usually around 15-17 PSI) then it is possible that engine compression is finding its way into your cooling system. If this happens you usually would notice an increase in coolant level and oil mixed in with it.
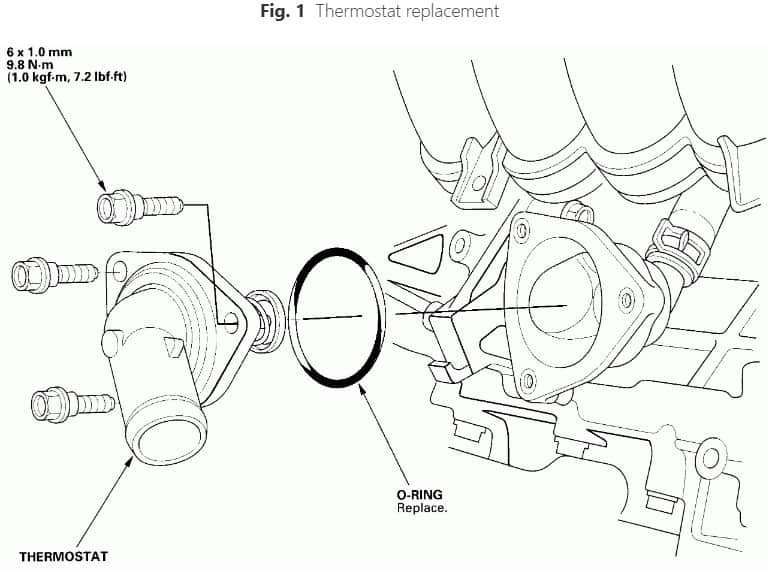
As long as you replaced the O-ring when you replaced the thermostat it should not leak form there.
Coolant found in engine oil
When coolant is found in the engine oil and since your coolant level is decreasing, the coolant is getting in somehow. Some possibilities include an oil cooler built into the radiator. The radiator breaks internally and leaks in the oil. But I do not think your vehicle has one from the factory. A blown intake and or head gasket can allow coolant into the oil. Also a cracked head or block will allow this to happen.
Generally when you find coolant leaking from under the passenger side dash it is from a busted heater core. This is a major job to replace on this vehicle as it calls for 7.3 hours labor and does not include recharging the Air Conditioning system.
Heater Core Replacement
NOTE: Be sure to acquire the anti–theft code for the radio; then, write down the frequencies for the preset buttons.
Before servicing the vehicle, refer to the precautions in the beginning of this section.
Disconnect the negative battery cable.CAUTIONAfter disconnecting the negative battery cable, wait for at least 3 minutes for the SRS module to deplete its energy.
Drain the cooling system into a clean container for reuse.
Remove or disconnect the following:
Heater hoses from the heater core
Heater housing-to-cowl nut, located in the engine compartment
Remove the instrument panel by removing or disconnecting the following:
Front seats
Front and rear consoles
Lower dashboard-to-instrument panel screws and the lower dashboard, located on the driver’s side
Knee bolster
Glove box
4 glove box frame-to-instrument panel bolts and the frame
Clock
Moon roof switch
Stereo radio/cassette
Lower steering column cover clamps and the cover
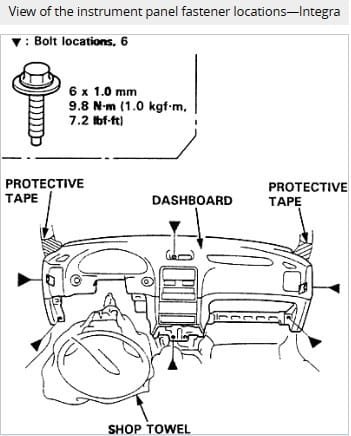
Wrap a shop towel around the steering column to prevent damage to the column.
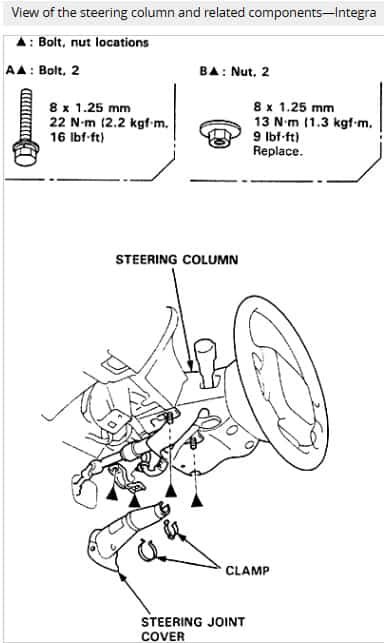
Steering column-to-instrument panel nuts/bolts and lower the steering column
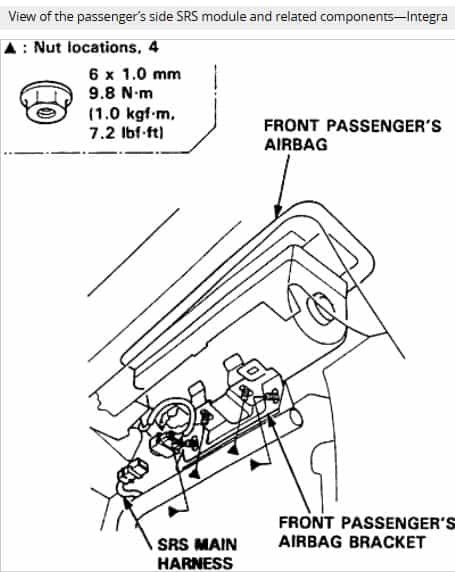
SRS module-to-instrument panel nuts (located on the driver’s side); then, carefully, remove the SRS module and disconnect the electrical connector
Air mix control cable and electrical connectors, located at the center of the instrument panel
Antenna lead
Electrical connectors, located at the under–dash fuse/relay box
Pry out the access panels, from both sides of the instrument panel
Instrument panel-to-chassis bolts and remove the instrument panel
Wiring harness clips; then, remove the 4 heater housing-to-blower motor duct screws and the duct, (models not equipped with air conditioning only)
If equipped with air conditioning, remove the evaporator housing removing or disconnecting the following:
Discharge and recover the air conditioning system refrigerant
Refrigerant lines from the evaporator core, discard the O–rings and plug the openings to prevent contamination
Cut the insulation pad (at the firewall) at the lower evaporator housing-to-chassis location
Thermostat electrical connector, located at the evaporator housing
Wiring harness clips from the evaporator housing
Evaporator housing-to-chassis screws, the nut and bolt
Drain hose
Evaporator housing, carefully
2 SRS support beam bolts, nut and the SRS beam, located at the passenger’s side
Mode control motor connector and the wiring harness clip from the heater housing
Heater housing-to-chassis nuts and the heater housing
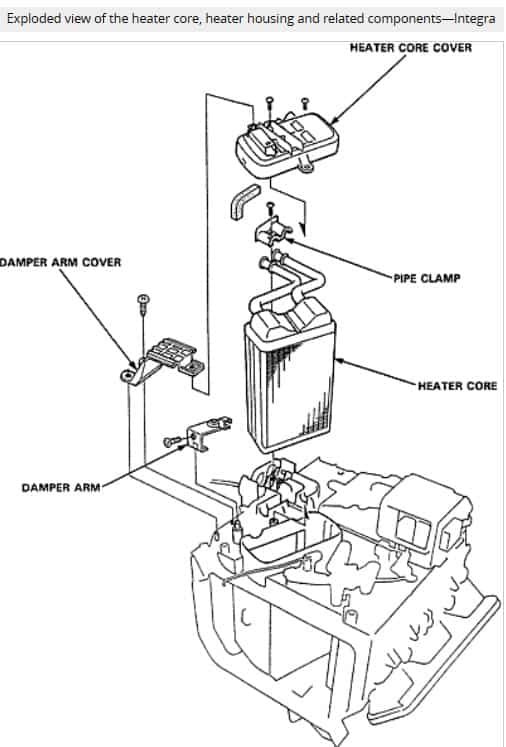
Remove the damper arm cover-to-heater housing screw and the cover.
Remove or disconnect the following:
Damper arm link; then, remove the damper arm-to-heater housing screw and the arm
2 heater core cover-to-heater housing screws and the cover
Pipe clamp screw and the clamp
Heater core from the heater housing
To install:
Install or connect the following:
Heater core to the heater housing
Pipe clamp screw and the clamp
Heater core cover and the 2 cover-to-heater housing screws
Damper arm-to-heater housing screw and the arm; then, connect the damper arm link
Damper arm cover and the cover-to-heater housing screw
Heater housing and the heater housing-to-chassis nuts
Mode control motor connector and the wiring harness clip to the heater housing
SRS support beam, nut and the 2 SRS beam bolts on the passengers side
If equipped with air conditioning, install the evaporator housing by installing or connecting the following:
Evaporator housing
Drain hose
4 evaporator housing-to-chassis screws, the nut and bolt
Wiring harness clips to the evaporator housing
Thermostat electrical connector at the evaporator housing
Refrigerant lines to the evaporator core making sure to use new O–rings
Heater housing-to-blower motor duct and the 4 duct screws; then, connect the wiring harness clips (models not equipped with air conditioning only)
Install the instrument panel by installing or connecting the following:
instrument panel and the instrument panel-to-chassis bolts
access panels on both sides of the instrument panel
Electrical connectors at the under-dash fuse/relay box
Antenna lead
Air mix control cable and electrical connectors at the center of the instrument panel
SRS module electrical connector (located on the passenger’s side) and torque the SRS module-to-instrument panel nuts to 84 inch lbs. (9.8 Nm)
Steering column and torque the steering column-to-instrument panel nuts to 108 ft. lbs. (13 Nm) and the bolts to 16 ft. lbs. (22 Nm)
Lower steering column cover and the cover clamps
Stereo radio/cassette
Moon roof switch
Clock
Glove box frame and the 4 frame-to-instrument panel bolts
Glove box
Knee bolster
Lower dashboard and the lower dashboard-to-instrument panel screws on the drivers side
Front and rear consoles
Front seats
Heater housing-to-cowl nut (located in the engine compartment) and torque to 16 ft. lbs. (22 Nm)
Heater hoses to the heater core
Refill the cooling system.
Connect the negative battery cable.
Evacuate, charge and leak test the air conditioning system refrigerant.
Operate the engine to normal operating temperatures; then, check the climate control operation and check for leaks.