
Motorcycle Engine Repair


Motorcycle engine repair procedures
Here is all about the motorcycle engine repair that may help you to troubleshoot your problem or know more about your motorcycle engine repair.
-
Changing a Spark Plug on Your Motorcycle
Material :
- Socket Driver
- 3/16 or 5/8 deep socket
- 3" and 6" drive extensions
- Swivel adapter for the driver allows for tight spaces
Procedure :
- Get a service/repair manual before you start any of your own work on your vehicle.
- Make sure your motor is off and cool before you start.
- Take just one spark plug wire off one plug by grabbing the spark plug wire boot and not the wire itself. Or use a spark plug wire puller.
- Make sure there is no dirt and/or oil around the spark plug. If needed, wipe the area around the spark plug hole being careful not to brush the dirt and oil away from the hole.
- Take out that plug with the proper tools by turning the plug to the left (counter clockwise). Usually the tool is a 13/16 or 5/8 deep socket. You may have to have a swivel joint and an extension also.
- Replace it with a new one turning the spark plug in by hand until hand tight.
- Use the same tool you used to take out the old plug to snug up the new plug.
- Connect the spark plug wire onto the new plug. Make sure it is on. They usually kind of snap on.
- Follow steps three through eight until all spark plugs have been replaced.
Note :
- While you are at the parts store you might want to get a spark plug gaper and spark plug wire puller. Even though the gap is pre set on new plugs it is a very good idea to check it (ask the counter clerk at the automotive parts store for the recommended gap). The wire puller saves the wires from pulling apart from the boot.
- Doing just one plug at a time helps you to keep everything in order. A crossed plug wire means the vehicle will miss fire or fire out of order.
- Take a good look at the old plugs. They can tell you a lot on how your vehicle is running.
You can have the hottest cam, perfect ignition timing, clean carburetor, and fresh gas, but without good compression... that engine is not going to run. The first thing to do, when a non running bike comes in, is to run a compression test. If the engine does not have at least 100 PSI (Pounds per Square Inch) in each cylinder, then don't work on it, except to rebuild it. It would be a waste of the customers money if you "Tried" to make it run.
The drill is simple. Remove all the spark plugs, ground all the spark plug wires or turn off the ignition, if possible. Screw or push the end of the gauge into the spark plug hole, open the throttle wide, and kick away. I like to kick (or turn the engine over with the electric starter) about four to five times and then check the gauge. Remember the reading, release the pressure on the gauge, by pushing the little releases, and do it again. If the reading changes, do it till you get several readings that are all the same. That would be the correct pressure.
When you remove the spark plug, it might be a good idea to loosen the plug a bit and then blow out and around the plug with compressed air. This is to blow out any bits of dirt that might fall into the engine through the spark plug hole, as you remove the plug. This is an especially good idea on dirt bike engines with deep, forward facing, spark plug holes.
Technically, You should do this when the engine is hot. A hot engine would probably read a few pounds more, but a cold reading will tell you what you need to know. Run the test on each cylinder. All the cylinders on an engine should be within ten pounds of each other. In other words, a four cylinder engine reading 145 PSI, 150 PSI, 147 PSI, and 155 PSI would be considered good. If it had 135 PSI, 150 PSI, 150 PSI and 155 PSI, it would not be considered good. Something is starting to go wrong with that first cylinder. OK, you have a cylinder that reads low. Is it valves or rings, leaking that compression ? A quick, down and dirty test is this. Squirt some oil, maybe a teaspoon's worth, into the cylinder through the spark plug hole. Now run the test again. The oil will hold compression for several turns of the engine. If your retest with oil gives higher compression, you will know the rings are worn. If there is no change in compression, it's the valves that are leaking. If you think it's the valves, it's always a good idea to check the valve tappet clearance. If the valves are tight, they could be leaking compression. If the valves are tight, reset them to the proper clearance and test again. if your compression comes back don't thank your luck, thank Jesus ! He just saved you an engine rebuild.
If you have an engine with Constant Velocity carbs the test is still done the same, with the throttles wide open. You might think they would read different, but they don't seem to.
Sometimes the spark plug holes are kind of weird in the size department and you will have to use an adapter on the end of the compression tester gauge. You can get a lot of different types of adapters, but sometimes you may need a special adapter that no one sells. You can try to use the push type of tester. It has a rubber tip that fits into the spark plug hole and is held there by hand pressure. Sometimes, due to the position of the spark plug, that will not work. If you can't buy the right adapter you can make one out of an old spark plug.
To make one, simply take a spark plug that fits the engine you want to test and remove the part of the metal base that is crimped over the ceramic portion of the spark plug. You can do this with a hack saw, and the crimped part will come loose like a ring. Now you can knock the ceramic part of the plug out with a drift from the nose end of the plug. This leaves you with just the metal portion of the plug. Now you can cut threads inside the end with a tap, like the one above, or weld it up with metal and redrill it to the right hole size if the plug is too big to tap as is.
If you don't have a compression gauge handy, all is not lost. A down and dirty way to do it is to simply press your thumb over the spark plug hole and hold it there tight. Now have someone kick the engine over. No matter how hard you push your thumb, the compression pressure should blow it off the hole smartly. If it won't, you don't have enough compression to start the engine.
Hard Starting Motorcycle Engines Turn Over Slowly
Big-inch, high-compression motorcycle engines can be a bear to start. They fire off when they spin, but getting them to turn over can be taxing on motorcycle parts like starters and electrics. There are a few things you can do to make life easier on your starting system, some mechanical, some electrical. First you need to determine if the slow cranking is mechanical or electrical in nature. We like to do a cranking compression check with the throttle open. High performance motorcycle engines will read about 180psi, more than that suggests too mild a cam for the compression ratio. Installing a cam with more overlap will help this. Altering the degree on your cam can also help, this requires special timing tools and is usually a motorcycle parts shop job.
If your cranking compression is within reason, other mechanical causes for slow cranking could be a worn or binding starter or drive, melted stator dragging on the rotor, hydraulic lifter bleed down, seized piston, or oil/gas sumped motor. In addition, high viscosity oils run at lower temperatures will cause sluggish cranking. We run 50 or 60w oils in the heat of summer, but when morning temps dip into the 50's we switch back to 20/50w and it makes a world of difference in the way the motorcycle engines start and warm up.
Electrical causes are common too, so an amp draw check on the starter is in order. A weak battery, corroded or undersize battery cables, poor wiring connections, or inadequate ignition timing will cause problems. Some very large motorcycle engines require a special advance curve with more ignition retard at the beginning to keep them from kicking back and spewing the starter gears.
On race bikes you can also re-wire the handlebar kill switch so that the engine will crank with the ignition off, then flick the switch on once the engine is spinning. This is also helpful in service applications. I like to put my hand on battery cables after cranking the motorcycle engine for a few seconds and check for heat. If the wires get very warm, they may have internal resistance or be too small for the amount of current in them. A second ground cable from the battery directly to the starter can help many times, but heavy duty cables like the Fisher setups are the best. On large motors, S&S recommends leaving the throttle closed until the engine fires, it makes most enrichener systems function better and because it admits less air, it reduces cranking compression.
For extra-stubborn cases, you can install compression releases. On motorcycle engines with dual plug machining like Rev-Tech or the new S&S TC88 heads it's easy, but on earlier or stock engines it requires dis-assembly and machining an extra plug hole in the heads.
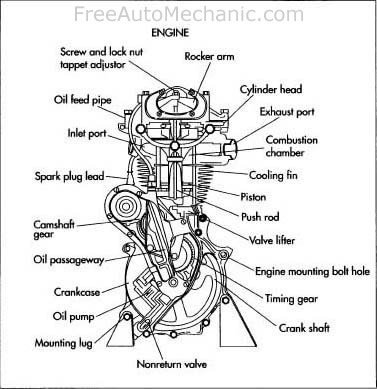
Motercycle Engine area Datails
Left side engine area details
- Battery : The motorcycle battery can be located in various positions on the bike. It can be hidden from sight. Some motorcycle batteries require that you check their level in each cell periodically. Other batteries are sealed and require no maintenance.
- Choke : The motorcycle Choke is used when the engine is cold. The Choke may be located on the handlebars or on the side of the motorcycle in the motor area. The motorcycle Choke is pulled out or otherwise activated when the motor is cold before you attempt to start the bike. After the bike has warmed up and before you start riding, push the choke back in or otherwise place it in its running position.
- Cylinder : This V-Twin motor has two cylinders. Since the V-Twin is air-cooled, there are cooling fins on the exterior of the cylinders. Bikes being sold today have one, two, three, four, or six cylinders. Many of these are liquid-cooled. The cylinders may be arranged in various configurations including V-twin, V-4, parallel-twin, L-twin, inline triple, inline-4, flat-4 and flat-6
- Cylinder Head : At the top of the cylinder is the Cylinder Head. It forms the top of the combustion chamber and contains the spark plug(s), valves, and other intake and exhaust components.
- Foot Peg : Foot Pegs are the place where you place your feet on a bike. Foot Pegs can be directly under the rider as shown or forward so that the rider's legs are stretched out in the cruiser position. In some cases, the pegs may be farther back for a more sportbike or racing position. There are a variety of shapes and designs for foot pegs. Floorboards sometimes take the place of pegs on some touring machines.
- Fuel Petcock Valve : Most motorcycles have a Fuel Petcock Valve on the engine to shutoff the supply of gasoline. It has at least three positions: ON, OFF, and RESERVE. The rider turns the petcock to RESERVE when the reserve area of the gas tank is reached. Some motorcycles don't have petcocks and instead have gas gauges indicating remaining fuel. Many of these bikes have low-fuel indicator lights as well. Once the motorcycle Fuel Petcock Valve is turned on, the ignition switch turned on, the transmission placed in neutral, the choke pulled out, and the KILL switch turned to the run position, the motorcycle can be started.
- Gear Shift : The motorcycle gear shift is on the left-hand side of the motorcycle just ahead of the foot peg. The motorcycle gear shift controls a ratchet mechanism that shifts the gears. Most motorcycles use a 1-N-2-3-4-5 positioning of the gear shift lever with the "1" being all the way down. Upshifts from first gear are accomplished by a hard upward thrust with the top of the boot on the underside of the shift lever after first pulling in the clutch. The first upward kick from first gear goes through neutral directly to second gear. The gear shift lever is released after each upward kick. Successive gear shifts upward take the machine to third, fourth, and then fifth (or higher) gear. Downshifts occur by pulling in the clutch and kicking down the gear shift lever one gear at a time and releasing it after the shift in preparation for the next kick down. There is a complex motion involving the left hand operating the clutch, the left foot operating the gear shift, and the right hand opening and closing the throttle to accomplish smooth shifting both accelerating and decelerating.
- Highway Peg : Motorcycle highway pegs are the place where you place your feet to stretch out on a long ride. Highway pegs are always forward so that the rider's legs are stretched out in the cruiser position. In the Harley picture, you can actually see two different highway pegs placed at different positions. There are a variety of shapes and designs for motorcycle highway pegs. Floorboards sometimes take the place of highway pegs on some motorcycles.
- Horn : Usually motorcycle horns are pretty pathetic. Some riders have chosen to upgrade the size and noise level of their motorcycle horns to be heard better. It's probably better to be prepared defensively to keep your bike out of trouble than to rely on warning someone else with your motorcycle horn
- Ignition Switch : The ignition key goes in the Ignition Switch. Many motorcycles have the Ignition Switch in the middle of the handlebars. Others such as the Sportster have the ignition on the left-side of the engine as shown. Once the ignition switch is turned on, the transmission placed in neutral, the choke pulled out, the fuel petcock turned on and the KILL switch turned to the run position, the motorcycle can be started
- Oil Filter : The motorcycle oil filter is just like the one on a car except many riders will chrome them since they appear as part of the engine. Many riders do their own oil changes. If you're one of them, make sure you know which oil and oil filter to use and seek out specific instructions on how to do the motorcycle oil change procedure.
- Passenger Peg : Motorcycle Passenger Pegs are the place where your passenger places his/her feet on a bike. There are a variety of shapes and designs for motorcycle passenger pegs. Floorboards sometimes take the place of passenger pegs on some touring machines.
- Primary Chain Cover : Behind the motorcycle primary chain cover is the primary drive, clutch, and transmission. Harley-Davidson still uses an external drive that connects the engine and transmission. Other manufacturers have gone to a unitized engine/transmission system.
- Rocker Box : Above the cylinder head is what is called a rocker box on this Sportster. Other engines may have valve covers or other components. The rocker box contains the mechanisms that control the rocker arm assemblies that open and close the valves.
- Spark Plug : Motorcycle Spark Plugs provide the spark necessary to ignite the air-fuel mixture in the engine to cause combustion. Some Spark Plugs are readily visible as in this Sportster picture. Others are completely hidden behind plastic and other bodywork. There can be more than one spark plug for each cylinder. There is a technique for replacing a spark plug. Check out Basic Motorcycle Tips in the Related Resources section in the sidebar.
- Crankcase Cover : The crankcase cover is the right-side cover to the bottom end of the engine. Most of this cover is actually the gearcase cover where the cam and pinion gears reside.
- Muffler : The motorcycle Muffler, for purposes of description here, includes all pipes and baffles necessary to quiet the exhaust noise and match with the carburetor jetting. Factory mufflers are often changed to aftermarket pipes to get the right sound and performance desired by the rider.
- Oil Tank : The motorcycle Oil Tank is a familiar sight on Harley-Davidson motorcycles. It is not seen much in other brands where the oil source is integrated with the engine. The Oil Tank contains the oil and delivers it to the oil pump through hoses.
- Rear Foot Brake Pedal : The motorcycle rear foot brake pedal is located on the right side of the motorcycle just in front of the foot peg. It is connected to the rear master cylinder. Pressure on the brake pedal by the right foot controls the rear brakes of the motorcycle.
- Rear Master Cylinder : The rear foot brake pedal on the right side of the motorcycle works through the rear master cylinder to control the rear brakes.
What Every Lubricant Must Do
Though the ability to minimize friction is the number one function of a lubricant , there are other major functions that must be considered. Here are some of the basics without getting to technical. A lubricant is likely to be also required to:
- Clean :
-
A lubricant must maintain internal cleanliness by suspending contaminants from adhering to components
-
Cool Moving Elements :
Reducing friction will reduce the amount of heat that is generated and lower the operating temperature of the components. A lubricant must also absorb heat from components and transfer it to a location where it can be safely dissipated.
-
Prevent Contamination :
The lubricant should act as a dynamic seal in locations such as the piston, piston ring and cylinder contact areas. This minimizes contamination by combustion byproducts (for example) in the lubricating system. Lubricants are also relied upon to support mechanical seals found elsewhere and to minimize external contamination and fluid loss.
-
Dampen Shock :
The lubricant may be required to cushion the blows of mechanical shock. A lubricant film can absorb and dispense energy spikes over a broader contact area.
-
Transfer Energy :
A lubricant may be required to act as an energy transfer median as in the case of hydraulic equipment or lifters in an automotive engine.
-
Prevent Corrosion
A lubricant must also have the ability to prevent or minimize internal component corrosion. This can be accomplished either by chemically neutralizing the corrosive products or by setting up a barrier between the components and the corrosive material.
