


1) The first thing I do is insert a temperature gauge in the middle air vent ( the middle vent gives you the most accurate reading )
Start the car and turn the air conditioning to Max and take a temperature reading. This gives you a starting point. After all you want it cooler than it already is or you wouldn't be messing with it.

2) Now you need to look at the compressor to see if the clutch is cycling (clicking on and off). If it is, then most likely you are just a bit low on freon. (Skip to step 11). If it is not cycling proceed to step 3
This some times takes 10 - 30 seconds Between cycles. You want to see the inside of the clutch spinning along with the outside when turned on (engaged)

3) There are three reasons the air conditioning compressor clutch will not engage or turn on.
- The compressor clutch solenoid is shot. Replacing the compressor will fix this.
- The air conditioning system is very low on freon or empty. Refilling the system required.(Skip to step 10)
- There is an electrical problem in the air conditioning circuit. Finding and repairing the short or open in the air conditioning circuit will be necessary. (Skip to step 5)
Now we just need to diagnose the problem and decide what coarse of action we need to take.
4) Evacuate (remove) the freon from the system with an approved evacuation machine. Disconnect the Air Conditioning lines from the compressor. Remove the belt from the Air Conditioning Compressor. Disconnect any electrical connections. Remove the bolts that hold the Compressor in place. Install the replacement compressor in the reverse order. Then proceed to step 10.
*NOTE* Most all manufacturers require the system be flushed. Also required are the replacement of the Accumulator and orifice tube for warranty purposes.
5) OK, the Air Conditioning Compressor Clutch will not engage, so lets figure out why not. With the ignition key on, unplug the low pressure switch (clutch cycling switch) and place a jumper wire across the connector. The switch is generally located on the side of the accumulator. If the compressor clutch does not click in then you need to check for Battery Voltage at the connector.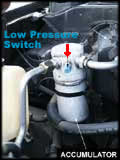

7) If there is battery voltage at the low pressure switch connector and the clutch does not click in when the jumper wire is attached, then you will need to move to the A/C Clutch Relay.
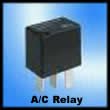
8) Make sure you have good battery positive and ground at the relay. If you do not receive a 2nd battery voltage when the jumper wire is attached, then the wire may need to be replaced.If you do have 2 positives, a good ground but do not see power leaving to the compressor clutch you will need to replace the Air Conditioning Clutch Relay/AC Relay.
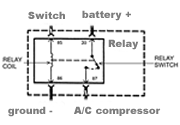
9) If you do have Power leaving the A/C Clutch Relay and heading to the compressor but not power at the clutch, then replace the wire between the two.
If you have power at the compressor AND IT DOES NOT Click in (engage) then you need to replace the compressor. Refer to step 4

10) Once the Air Conditioning System has been open or is completely empty you will need to draw 30 psi of vacuum on the system. Once you have drawn vacuum on the system it is a good idea to see if it can hold that vacuum for at least an hour to make sure there are no leaks. You can use an air compressor attachment or an Air Conditioning machine to draw the vacuum on the system. An A/C machine will draw vacuum from both the high pressure side and the low pressure side ports. An Air compressor style or electric vacuum pump will only need to draw vacuum on the low pressure side.
The pump will connect to the low pressure port through a set of vacuum gauges . The Port is generally located on the accumulator but always found on the low pressure side of the system.

10 b) Now that you have vacuum on the system, leave the gauges connected to the low pressure port. You can attach a can of freon to the center hose or the port you used to draw vacuum.
*NOTE* Follow directions listed on can or hose assembly when attaching the can and follow all safety precautions at all times.11)You are ready to add refrigerant.
If you haven't already done so, connect your fill line to the low pressure port.
After you connect the center port of your A/C gauges to a can refrigerant, start the vehicle and turn on the air conditioner and set it to MAX. Next slowly open the low pressure manifold and let the freon flow into the system. Run the engine at 1500 rpm to allow the compressor to suck all the freon in. You may need to install a jumper wire at the low pressure switch connector to get the compressor going at first. Do this until you see 45-55 psi on the gauges at 1500 rpm.

*NOTE* Do Not fill system with more freon than listed on the vehicles manufacturer's labeled amount. Adding too much freon will actually not allow the A/C to cool properly and will create a loss of at least 10 degrees.
Temperature should read at least 30 degrees less than the outside temperature but not less than 33 degrees.
12) This will give you maximum cooling capabilities. Follow instructions on the Can of freon. Once filled take another temperature reading and compare it to your initial reading. It should be at least 30 degrees cooler.*NOTE* You will generally gain another - 10 degrees cooler when driving due to air flow across the condenser.

Car AC Check - How to check car ac for manual air conditioning or climate control systems
As an Amazon Associate I earn from qualifying purchases.
